The following images and descriptions explains how Sam and I had figured out how to change the 3rd person perspective to 2D, and how there aren’t any glitches where the camera would shift swiftly or have the camera move out of focus. Sam helped me to type up this document that explains what has been changed in the blue-print and in the settings.
Creating a “2D” perspective in 3D game. (Unreal)
This is in collaboration with a fellow student called Nav where he wanted my input on how to create a 2D style of game without creating an entire new project (we started in the third person project). I decided to attempt creating this, and this is a brief of my best efforts.
Tests
In the third person character blueprint that unreal gives you when you create a 3D project you can change many of the aspects of the camera, here are two we tried.
Changing the projection mode
In the details panel on the actually camera you can change the way it views your world, perspective or orthographic. It starts in perspective as that’s the 3D look that you normally want in third person perspective. Orthographic is best described as seeing the world flattened. We tested this to see if there was a really easy way to make it 2D. Now it did flatten and make it look like a 2D game, but you could still move the camera to view the world in 3D (so it didn’t do what we wanted it to, however it was still an interesting discovery).
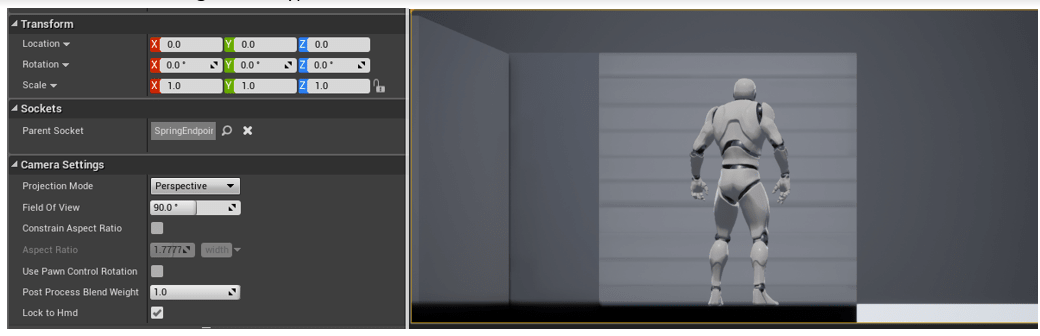
Increasing the boom arm.
On this test Sam helped me to increase the boom arm, to put it in an adequate distance between the camera and the player. The boom arm is like an invisible arm that connects the camera to the body, it is important not to move the camera off the boom arm if you are planning to move the camera as it can cause sporadic movements when you do some actions such as rotation.
Changing the Blueprint
After looking and messing around with the settings in the details panel we couldn’t find anything that would relate to what we were trying to do (interesting discoveries are the “Tests”). So Sam decide to change the character’s blueprint to see if that would work.
Removing unneeded components
Exactly like I put, I removed any of the blueprints and functions that I didn’t need anymore (or didn’t want). These are before and after of what I removed, I won’t go into detail but if you want to replicate it remove everything apart from Jump and Touch Input (if you want jumping in your game) and Movement input (don’t delete unless you want your character to be unable to move).
Editing Movement Input
So this was a bit of trial and error/guess work. Sam and I tried to guess what each bit did, deleted it and then tested to see if we were right. After some time we got a decent understanding of each bit (well Sam did and I was trying to follow). We removed everything we didn’t want and the character could only move left to right/ vice versa.

Problems
So after removing it we noticed it wouldn’t let us move the default character and the reason is that the blueprint (Add Movement Input) that tells your character how to move (direction wise) didn’t have the information to do it (World Direction). So we tried making Y (the axis which equals left and right) equal to 1, this didn’t work. Then what we did is we changed Y to -1 instead. This worked, but we don’t know why -1 works and +1 doesn’t (you can see the -1 in the next screenshot).
Next was after I got the character to move, it was moving left when it should be right or vice versa.
Cleaning up the blueprint
we noticed that we could make the blueprint run slightly better and effectively if we changed the Jump and Touch Input section. Sam noticed that it did a similar job so he deleted everything in the Touch Input section apart from the actual input register, then moved that to Jump and hooked it up exactly like it was before just more straight forward.
Changing Project Settings
Before we talked about the problem where the character would go the opposite direction, we wanted it to, still unsure of why ,but Sam did know a way around it. Sam and I messed around the project settings in unreal and we found where you could map new buttons, along with editing old ones. We then followed the steps below.
If you want to recreate follow these steps:
– Edit (on the top bar)
– Project settings
– Engine
– Input
– Bindings
– Axis Mapping
– Move Right
– Then change A to 1.0 (from -1.0) and D to -1.0 (from 1.0) (The numbers being the scale).

